How to Setup Event Tracking with Google Tag Manager
What is Event Tracking?
Event tracking is a form of conversion tracking that tracks user interactions with a website or app. You can think of an event as any user action that can be tracked and recorded independently of a simple page load. Some common events that marketers track include downloads, video plays, and button clicks. Most event tracking systems can be divided into three parts: event listeners, tags, and collection tools. There are a lot of event tracking, tag management, and analytics tools to choose from. I personally recommend Google Tag Manager because it’s the most cost-effective and accessible option for most brands. In this guide I’ll show you how to use GTM to start tracking events on your website.
Installing Google Tag Manager & Google Analytics
Before you begin you’ll need to install Google Analytics and Google Tag Manager on your site. If you need help with this, check out our how-to article or read Google’s documentation for installing Google Analytics and Google Tag Manager. Additionally, you will need admin privileges for your Google Analytics and Tag Manager accounts.
How to Setup Event Tracking in Google Tag Manager
Before You Begin
The first step to event tracking is mapping out your events and variables. Before you do anything else, make a list of events you want to track on your site. Make sure you keep your events organized because this will come in handy later. If possible, try to organize your events the same way your website is organized. If you need a template to work from, try copying the text in the box below.
----------------
EVENT GROUP NAME
----------------
Trigger Name:
ClickClass:
ClickElement:
ClikdID:
ClickText:
ClickURL:
	Tag Name:
	Category:
	Action:
	Label:
        Value:
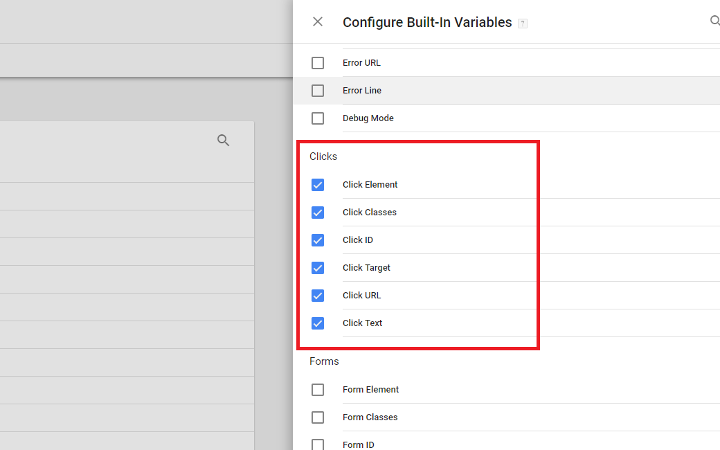
Configure Built-in Variables in Google Tag Manager
Before you can complete this project you need to configure the built-in variables in Google Tag Manager. GTM has a lot of built-in variables, but many of them aren’t active in the default implementation. Therefore, it’s up to you to configure GTM to track the right variables for your project. Let’s customize the built-in variables in your GTM container.
- Log in to Google Tag Manager and navigate to the Variables section using the left sidebar.
- Click on “configure” to open up the options menu on the right.
- Scroll down to the “Clicks” section and make sure every option is selected.
Part 1 – Create a Generic Click Listener
Now that you have a list of events you want to track and your built-in variables are configured, it’s time to gather your variables. There are a lot of ways to do this, but I recommend using a generic click listener with the GTM debug console. To do this you’ll need to create a generic click listener. Let’s get started.
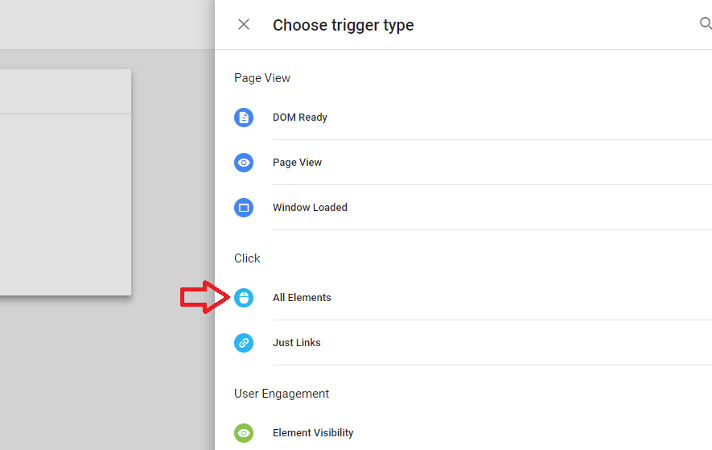
- Log in to GTM and navigate to the Triggers section using the left sidebar.
- Click “new” to create a new trigger. Name your trigger “Generic Click Trigger.”
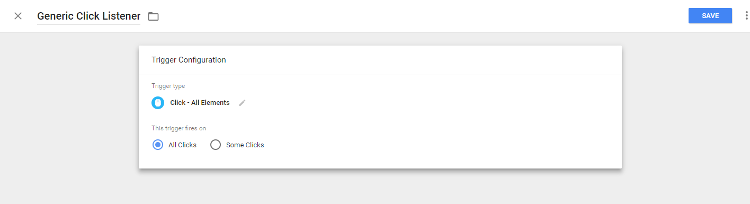
- Click on the trigger configuration box to select a trigger type. For the generic click listener scroll down to the “Click” section and select “All Elements.”
- Make sure “all clicks” is selected in the “this trigger fires on” section.
- Save your trigger and click the “submit” button in the upper-right to push the trigger live.
- Activate preview mode by clicking on “preview mode” in the upper-right. Now, when you visit your site you should see the GTM Debug Console overlay.
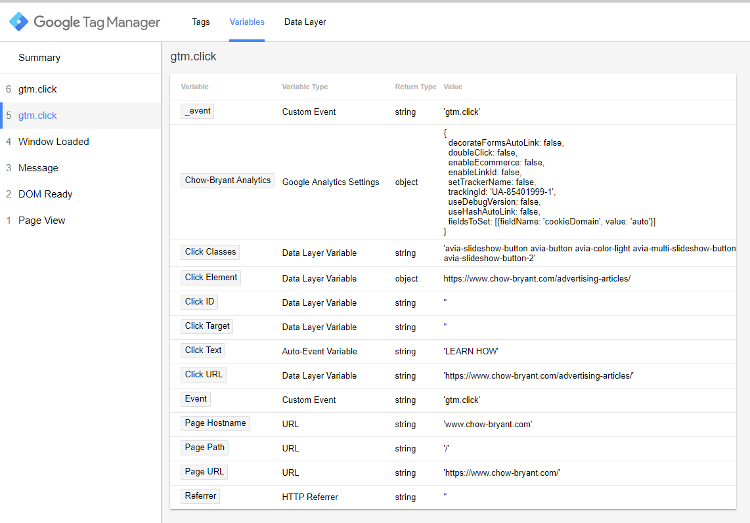
- Try clicking a few places on your site. Look at the left sidebar in the debug console and select one of the gtm.click values. Now, switch to the “variables” tab in the debug console.
- You should see a list of variables for each click like in the image below.
What Does the Generic Click Listener Do?
The process for creating the generic click listener is really similar to the one you will use to add your own triggers in a later step. For now, let’s explain what the generic click listener even does. In a nutshell the generic click listener is a trigger that fires on every click. The trigger will gather every variable associated with that click like the ClickClass, ClickElement, ClickID, ClickText, and ClickURL.
Why Do These Variables Matter?
When you start setting up event tracking you will use these variables to differentiate your different events. For instance, if you want to independently track clicks on two buttons with the same class, you’ll need to use a variable so Google Tag Manager knows which tag to fire. If the button text is different, then you can use ClickText as a variable so GTM can distinguish between these two different, yet similar, events. As a result, I highly recommend you record every variable available for each event. As you scale your event tracking (more on this later) you’ll want to avoid creating triggers that inadvertently fire tags for two different events (more on this later).
Part 2 – Map the Variables for Your Events
Now that your generic click listener is working it’s time to map out the variables. Open up the document or spreadsheet where you’re mapping out events and variables, and start mapping your variables.
- Start with your first event. Navigate to the page(s) where this event will be recorded.
- Click on the element you’re trying to track. Note: Page loads can make this really tricky. If you’re trying to track a clickable element with a Click URL (e.g. a link) then you will need to use ctrl+click or command+click to open the link in the new tab.
- Find the corresponding gtm.click entry and navigate to the “variables” tab.
- Record all of the variables you see on your document or spreadsheet.
- Repeat these steps for every event you plan to track.
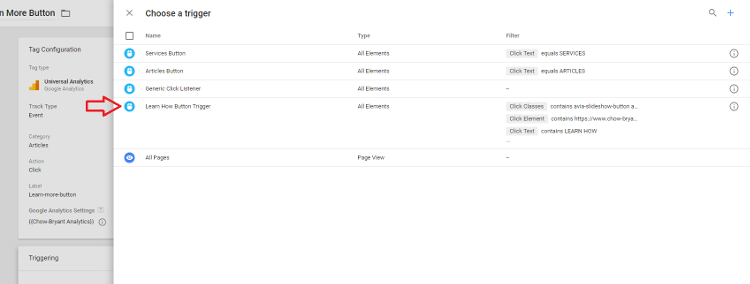
Part 3 – Create a Trigger in Google Tag Manager
You’ve mapped your events, configured GTM’s built-in variables, and recorded all of the variables for your events. It’s finally time to start setting up event tracking. Open up your event mapping document or spreadsheet and start making your triggers.
- In to GTM and navigate to the Triggers section using the left sidebar.
- Click “new” to create a new trigger and name your trigger. Use descriptive names or labels. This will save you a lot of time later when you’re setting up event tags and assigning triggers.
- Click on the trigger configuration box to select a trigger type. Scroll down to the “Click” section and select “All Elements.”
- Instead of selecting “all clicks” switch this to “some clicks.” This should open up a new dialog where you can set the conditions for your trigger.
- Use the dropdowns to select the right variable and copy/paste from your event mapping document or spreadsheet.
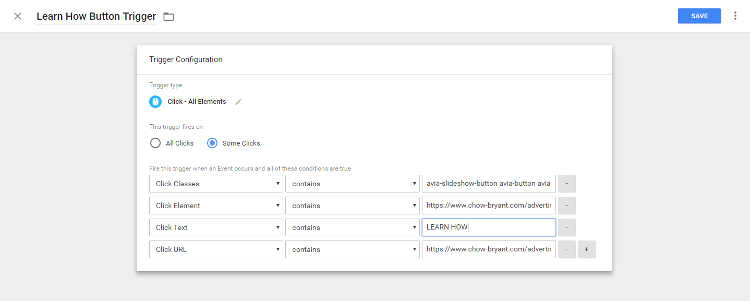
- Save your trigger.
- Repeat these steps to create a new trigger for each event you intend to track.
Part 4 – Create a Universal Analytics Event Tag in Google Tag Manager
You should now have a complete set of event triggers ready to be assigned to event tags. Now it’s time to start creating our event tags. For this guide I’ll go over the steps for creating Universal Analytics event tags.
- In GTM navigate to the “Tags” section in the left sidebar.
- Click “new” to create a new tag and name your tag. You can use any naming convention you like. For Analytics events I use this template: GA – Event – [Event Name].
- Click on the “tag configuration” box and select Universal Analytics as your tag type.
- Locate the “Track Type” dropdown in the configuration box and select “Event.” This should open up a dialog where you can add your event tracking parameters. Note: the value field is optional. If you don’t have a currency value for this goal simply leave it blank.
- Use your event mapping document or spreadsheet to fill in the event category, action, label, and value. Use the categories, actions, and labels to organize your events in Google Analytics. Note: I highly recommend using copy/paste to fill in event tracking parameters. One typo and Analytics won’t record your events.
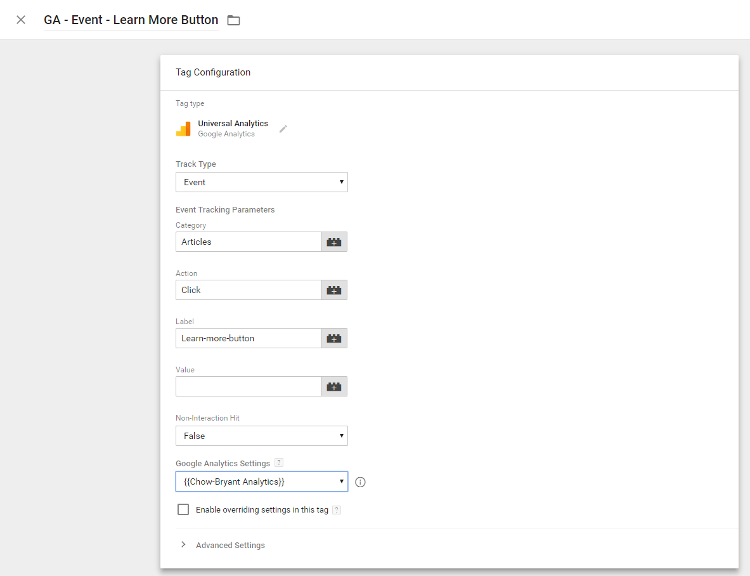
- Scroll down to the Google Analytics settings and use the dropdown to select your analytics tag.
- Click on the “triggering” box and select the trigger you setup for this particular event.
- Save your event.
- Repeat this process for every event you intend to track. When you’re finished you should have a trigger and tag for every event you intend to track in Google Analytics.
Part 5 – Testing Event Tracking in the GTM Debug Console
No event tracking project is complete until you’ve tested your triggers and tags. At this point you can move on to adding your events as goals in Google Analytics, but I prefer to test the tags and triggers, first. This helps cut down on the number of test events recorded in Google Analytics in the testing phase. Whatever method you use, I recommend adding an annotation in Google Analytics as a reminder of when you setup and tested event tracking. To test your triggers and tags follow these steps:
- Make sure preview mode is still activated in Google Tag Manager.
- Open your event mapping document or spreadsheet and browse to your website.
- Make sure the GTM debug console is visible and on the “Tags” tab.
- Trigger your event and verify that the right tag(s) fired for the event. Note: If your tag doesn’t fire go back into GTM and make sure you selected the right dropdowns for your event parameters. Most of the time the tag didn’t fire because you intended to use ClickElement, but the dropdown says ClickClasses. If the tag still doesn’t fire then switch to the “variables” tab in the debug console and make sure you recorded the right values on your event tracking document or spreadsheet.
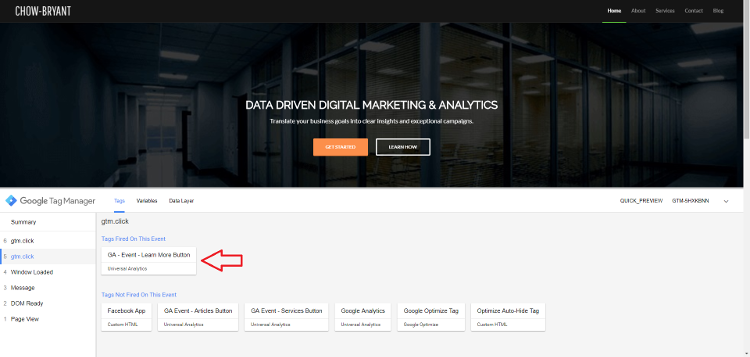
- Repeat this process and make adjustments until every tag is firing properly.
How to Record Your Tracked Events as Goals and Conversions
Part 6 – Add Event Tracking to Google Analytics as Goals
Now that you know your event tracking is working you’ll want to record these events in Google Analytics. Grab your document or spreadsheet and let’s get started:
- Log in to Google Analytics and navigate to Admin –> View –> Goals. Note: I recommend setting this up on your testing view before rolling it out to your reporting view.
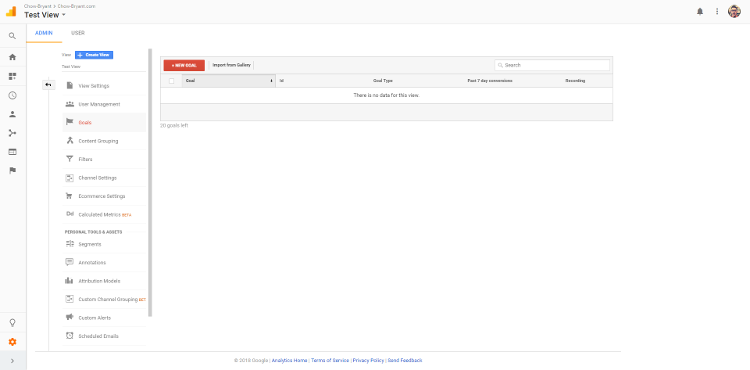
- Click “+ new goal” to create a new goal.
- Select “custom” goal and click “continue.”
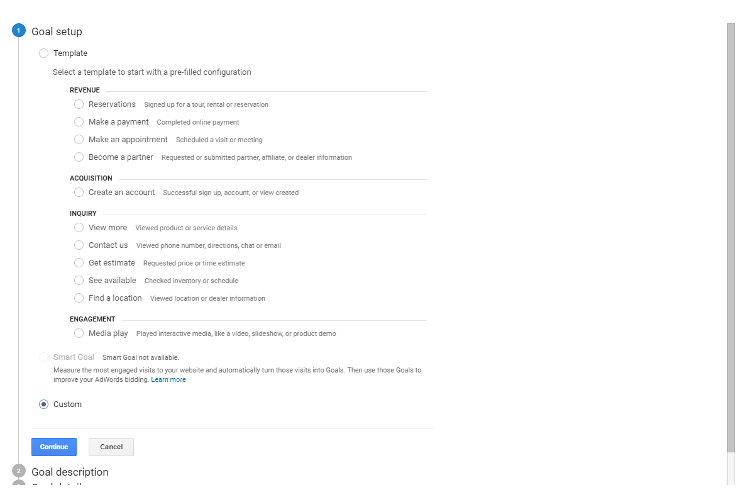
- Enter the name of your goal. I recommend using the same name for your Google Analytics goals and their corresponding GTM event tags.
- Select “event” for the goal type and click “continue.”
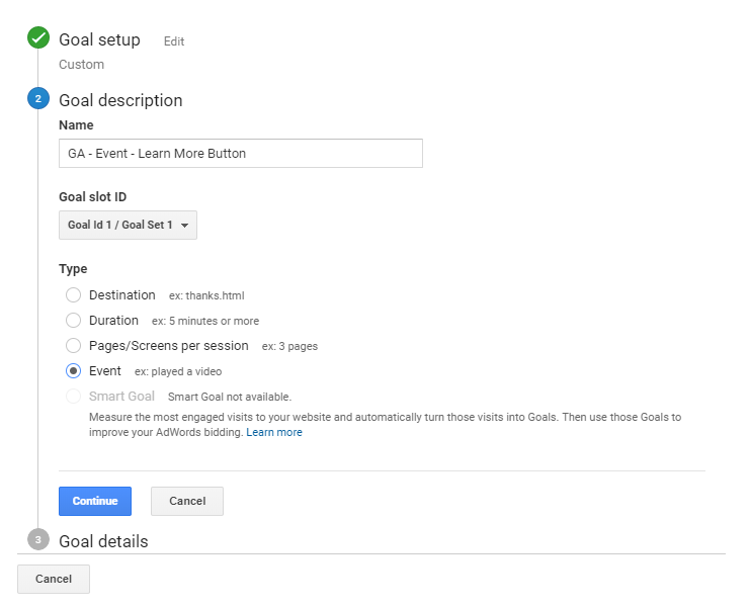
- Open your event mapping document or spreadsheet and copy/paste your event conditions.
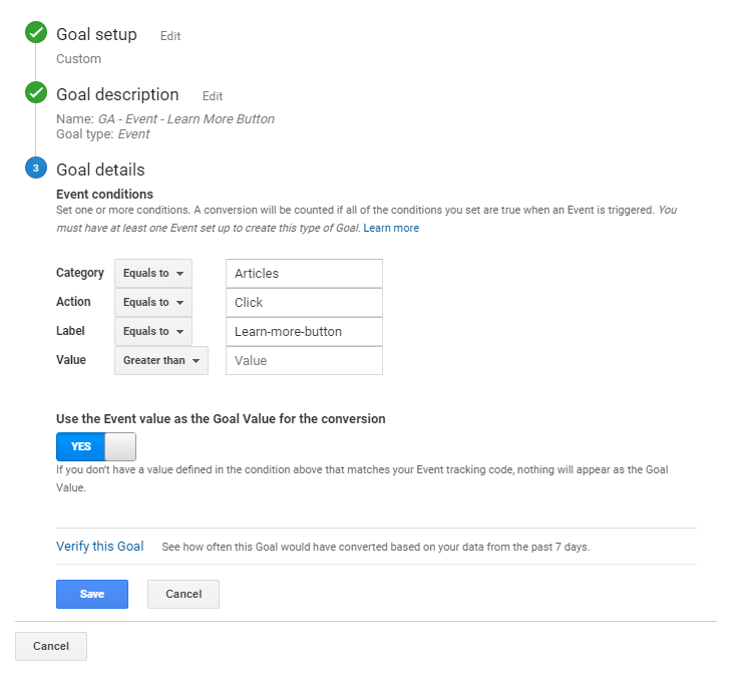
- Save your new goal.
- Repeat this process for every event you setup in Google Tag Manager.
Part 7 – Testing Google Analytics Goals with Real-Time Event Reports
It’s tempting to assume that the project is complete at this point. After all, you just used copy/paste to add these goals to Google Analytics, and already tested this using the Google Tag Manager debug console–what could go wrong you ask? Well, human error can and will happen. The last thing you want is to boast of this awesome new event tracking system you implemented and then doesn’t record anything in that month’s reports. It’s time for bug testing:
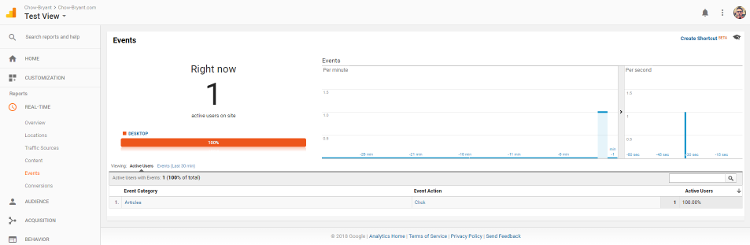
- In Google Analytics navigate to Real-Time –> Events to open the live events report.
- Open your event mapping document, and start going down the list.
- Trigger an event and then check the Real-Time Events report. You should see your events being tracked along with the categories and actions. Note: If you don’t see your events being fired, make sure you recorded the right event conditions in Google Analytics.
- Repeat this process for every event you setup, and adjust as needed.
- If you’re using multiple analytics views (and you should), then use the goal sharing feature to create a shareable link. Use this to add all of your goals to the rest of the views where you want to report on goals. Note: Google Analytics only has 20 goal slots per view. If you’re tracking more than 20 events you will need to organize these events into multiple analytics views.

Part 8 – Importing Goals into Google AdWords
If you’re running advertising campaigns on DoubleClick or AdWords, you definitely want to track conversions. Luckily, you just setup a robust event tracking and tag management system that works with every digital marketing channel. You’re almost done, so let’s put a bow on this project.
- Log in to Google AdWords and navigate to the Conversions section. In the new AdWords interface click on the wrench icon in the upper-right.
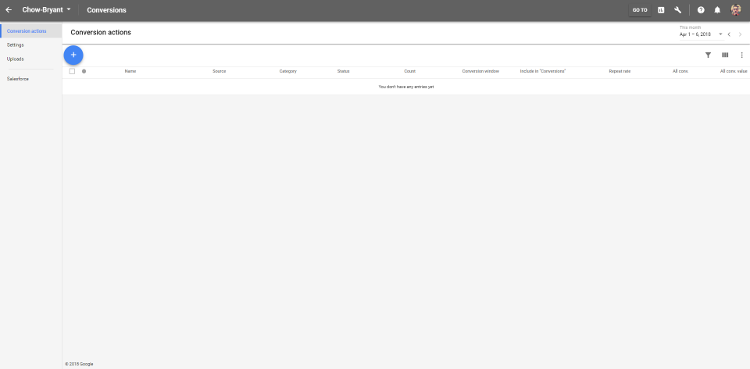
- Click “+” to add new conversions.
- On the next screen click “Import” box.

- Select “Google Analytics” and click “continue.”

- Now select every Google Analytics event you want to import and click “save and continue” at the bottom of the screen.

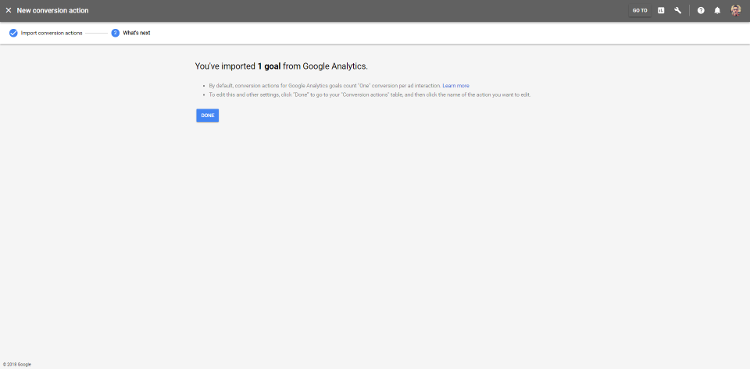
- You should see a confirmation screen letting you know how many goals you imported. Click “done.”
Part 9 – How to Scale Your Event Tracking
Your event tracking is finally complete and your brand is on its way to more accurate attribution reports. But what about scaling this system? What happens when your brand releases a new product, or goes through a site redesign? Ultimately, it’s your responsibility to keep all of this sorted out. If your event mapping document is incomplete (or worse doesn’t exist) then you’re liable to end up with a spaghetti bowl for event tracking. Therefore, yo should keep these things in mind when you’re scaling your event tracking:
Caveat Emptor with Labels
You can re-purpose some old triggers and tags, but do not rename your goals in Google Analytics. Changing your goal name is not retroactive and will corrupt your historical reports. The last thing you want is to pull a comparison report from last year and see goose eggs. Trust me, I’ve seen this happen in board meetings, and the meltdown is excruciating to watch.
Documentation is Your Friend
Document everything. Make annotations in Google Analytics and keep your event mapping document up-to-date. It may be months or even years until you have to scale your event tracking system, so don’t count on this info being fresh in your memory.
Spreadsheets Are Your Friend
It’s probably tempting to map your events in a document, but you can’t sort and filter a word doc. I highly recommend using a spreadsheet for your event mapping because it makes it easier to find duplicate variables on multiple events. The most common problem I run into when I’m scaling someone else’s event tracking is triggers with only one or two variables. Inevitably these variables overlap with other events and your triggers start to fire multiple tags in error. Few things are worse than having to deliver the news that last month’s reports over-recorded conversions and the cost-per-acquisition (CPA) figures are skewed downward. It looks good on paper until your client reconciles these reports with their bottom line. Then you look like a crook.
Not All Goals or Events are Conversions
Just because you are tracking a goal in Google Analytics doesn’t mean you should track this as a conversion. Resist the urge to use token goals with high completion rates just to pad your advertising reports. Again, the client will eventually reconcile these reports against their bottom line. Set yourself up for success and accept the reality of your campaigns. If the CPA is too high you need to address this via hard work, not reporting fraud. In the world of advertising we live and die by return on ad spend (ROAS). Take heart in the challenge to rise above, otherwise one of your competitors will.
Avoid Analysis Paralysis
Finally, just like not all goals/events are conversions, not all events are even worth tracking. As a result, you should resist the urge to create events for the sake of reportable work, and focus on only tracking events that are truly meaningful for your brand or client. If you’re unsure of the value of an event, try tracking it in a test view and monitor the results. Wait until you have positive confirmation before reporting on vague goals to your client or boss. I say this because it’s easier to add to your reporting than it is to take away. It may seem simple to remove a section from a report, but the psychological and political battles this can cause simply aren’t worth it and almost never productive.
The Most Important Step
Part 10 – Pizza Party!
This goes without saying. Throw a pizza party–you’ve earned it! If you’re on a budget, Little Caesar’s is about $12 for crazy bread and two pepperoni pizzas. That comes out to around $0.02 per calorie! Treat yo’self.
Get Help Setting Up Event Tracking for Your Brand
Real talk: This can be difficult. Testing and refining might be time consuming, but it’s an important part of making sure you have an accurate data set. In the event that you need help or this proves to be something that you’d just rather not do, get in touch with Chow-Bryant. Event tracking is one of the main parts of our analytics and tracking services, so we’re very familiar with how to set up event tracking for your brand’s needs. If you’re interested in adding event tracking to your website or app, contact us for a free consultation.


